Glass block windows are a fantastic way to add both aesthetic appeal and privacy to your space while still allowing light to filter through. The channel construction method is one of the most common and effective ways to install a glass block window in a framed opening. In order to do this, you have to be building within the opening itself, ensuring the space is properly prepared and framed. This guide will walk you through each step, from preparing the opening to completing the installation of the blocks.
Step 1: Prepare the Opening
Before you even think about installing the glass blocks, you’ll need to make sure the opening is ready.
A. Check the Opening Size
- For exterior panels, the maximum opening size is 50 square feet, and the frame should be secured on all four sides.
- For interior panels, the maximum opening size is 85 square feet, and the opening should be framed on at least two sides.
B. Use a Level to Ensure the Opening is Square
- Use a level to make sure the opening is plumb (vertically straight) and level (horizontally flat). It’s crucial for the glass blocks to sit properly and for the finished wall to look clean and even.

Step 2: Install the Perimeter Channel
The perimeter channel is what holds the glass blocks in place. Here’s how to install it:
A. Cut the Channel to Fit
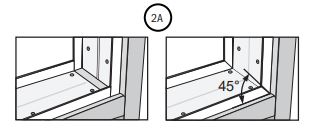
- Cut the perimeter channel to match the dimensions of the opening. You can either cut the channel ends straight or mitered, depending on your design preference.
B. Install the Bottom Channel First
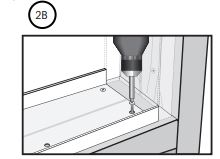
- Apply two 1/4” beads of sealant horizontally along the underside of the bottom channel, about 1/2” in from each edge. Insert screws at both ends of the channel to hold it securely in place.
C. Install the Side Channels
- Attach the side channels the same way you did for the bottom channel. Make sure each side is plumb (perfectly vertical) before screwing them in place.
D. Install the Top Channel
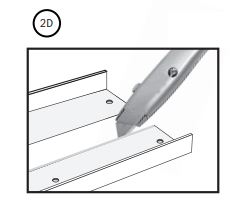
- Cut the top channel lengthwise using a utility knife, scoring along the center groove and then breaking it in half.
- Install the half-channel at the top of the opening, aligning it with the side channels.
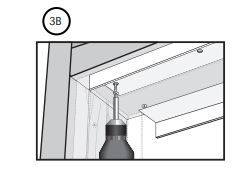
- Secure the channel by inserting 6×1” flat-head galvanized screws through the pre-drilled holes in the channel. Insert a screw at each end.
Step 3: Install the First Row of Blocks
Now that the channels are installed, it’s time to begin installing the glass blocks.
A. Prepare Horizontal Spacers
- Cut horizontal spacers to fit inside the vertical frame channels, ensuring they are snug.
B. Prepare Sealant
- Cut the nozzle of your sealant tube at a 45-degree angle around the 1/4″ mark.
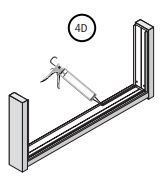
C. Apply Sealant to the Bottom Channel
- Apply two beads of sealant the full length of the bottom channel, about 1/4” in from each side.
D. Install the First Block
- Place the first glass block into the side channel and slide it into the bottom channel. Apply sealant behind the raised edge of the block.
- Insert a vertical spacer next to the block, then apply sealant to the next block and insert it snugly against the spacer.
- Continue installing blocks and spacers this way until the row is complete.
E. Check Alignment
- Ensure all blocks are aligned, sitting fully in the channel, and that the joints between them are tight.
F. Apply Sealant to the Top of the Row
- Apply two 1/4” beads of sealant across the top of the row, just behind the raised edges of the blocks.
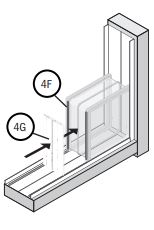
G. Install the Horizontal Spacer
- Place a horizontal spacer on top of the first row of blocks. If necessary, use multiple sections of spacer, but be sure to align joints directly above the vertical spacers.
H. Clean Excess Sealant
- Wipe away any excess sealant to keep the joint areas clean for the next row.
Step 4: Install the Second Through Penultimate Rows
Now it’s time to continue building the wall, row by row.
A. Apply Sealant to Spacers
- Apply two 1/4” beads of sealant to the edges of each horizontal spacer, about 1/4” in from the edge.

B. Install the Second Row
- Start the second row from the opposite side of the first row (if you installed the first row from left to right, install the second row from right to left).
- Continue installing glass blocks and spacers, applying sealant to the edges of each block.

C. Install the Remaining Rows
- Keep alternating between inserting blocks and vertical spacers, ensuring everything is aligned. Always check the alignment both vertically and horizontally.
Step 5: Install the Last Row of Blocks
The last row requires some extra attention to detail.
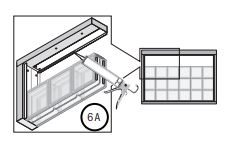
A. Apply Sealant to the Top Inside Leg of the Channel
- Apply a 1/4” bead of sealant along the inside leg of the top channel, where the blocks will make contact.
B. Install the Last Blocks
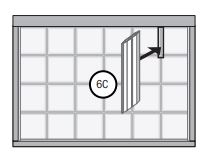
- Insert the last blocks, starting from the side jambs. Apply sealant as before, but do not apply sealant in the last vertical joint. Insert the last spacer after the final block.
C. Apply Sealant to the Top
- Apply a final bead of sealant along the top of the opening, 1/2” from the face of the blocks.
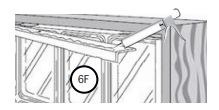
D. Install the Second Half of the Top Channel
- Slide the second half of the top channel into place, between the blocks and the top of the opening. If needed, tape the channel temporarily to hold it until the sealant cures.
Step 6: Let the Sealant Cure
It’s important to give the sealant time to set before finishing up.
A. Allow Curing Time
- Wait 24-48 hours for the sealant to fully cure before proceeding with finishing the joints.
Conclusion
Installing a glass block window using the channel construction method is a highly effective way to create a sturdy, attractive, and functional partition. By following these steps—starting with careful preparation and ending with a secure installation of the top channel—you’ll ensure that your glass block window stands the test of time and enhances the aesthetic appeal of your space. Just remember, patience is key—take your time, and the results will speak for themselves!



Give us a follow!